earlg
New Member

Posts: 48 
|
Post by earlg on Jun 9, 2021 17:40:10 GMT
I think I'm doing the images the way I should. If not, get after me about it and I'll figure something else out with them.
This is the little guy I'm working on repainting and rewiring and unfortunately yesterday afternoon the unit got jarred and now it's got a small leak in it just below the float where the solder joint is. I'm just sick about it, and I know it's not a lost cause but I probably need a little advice on this. I called a friend of mine that grew up in the refrigeration business and his Dad used to work on a couple of refrigerators in the restaurant I worked in 40 years ago that were at least as old as this thing is. He was a kid in those days, but does seem a little bit interested in the project. He would certainly know how to evacuate the thing and do that end of it, but is there more to it than just recharging it with the 152A (I think I have that right) refrigerant. Or should it be converted over to a capillary tube? His Mom suggested a wad of chewing gum, but she was being funny! I really like his mother, she is really smart and has a really good sense of humor.
I have a set of the valves he needs to connect up to this and also the service manual. If I can get him to take an interest in this project, I'm thinking you guys will have a much better idea about what I should tell him. I told him about this site as well, so he might read this post as well. Thanks SO much for your time and trouble. I really appreciate it.
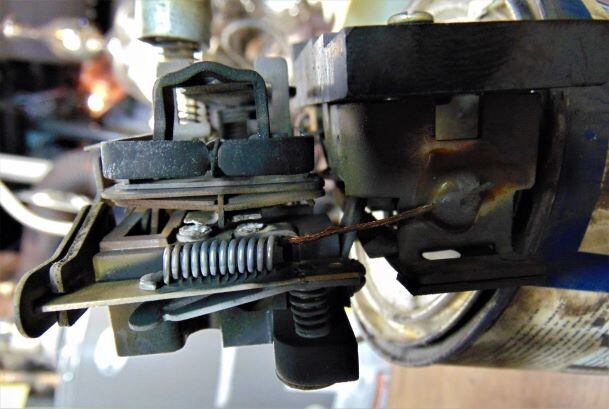
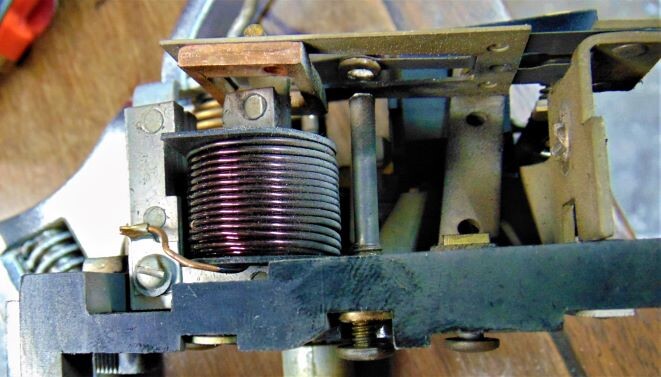
I posted a few pictures of the insides and components so you'd have an idea about the business end of it.
|
|
|
|
Post by ChrisJ on Jun 9, 2021 18:49:25 GMT
David has worked with SO2 far more than I have (which is none, so far..) but my understanding is your first priority is to keep air out of the system.
As soon as you can get it evacuated sealed up and pull a vacuum and then fill with nitrogen.
SO2 alone is harmless but get some moisture in it and it's really bad for things.
If the float valve is working I'd avoid a capillary tube.
|
|
earlg
New Member
Posts: 48
|
Post by earlg on Jun 9, 2021 19:36:38 GMT
Gosh, there is SO much information here and I'm just a UPS driver... I've been trying to get my head around these things for the last year, since I got a CA refrigerator that I really do like. This one came along, and it's nice and clean, but it has been tipped over. I'm getting the dents on the side sorted out so it can be repainted. So, maybe this was bound to happen and I just sped things up a bit. And I guess if it was going to happen, this is a good time for it.
When I called the local guy, he told me that evacuating it and stabilized shouldn't be a problem. I wasn't sure if the 152A would work with the float in place, but I have been doing more reading and watching David's videos and and see that it will work with it, which is nice. It seems to have settled down now, so I'll put some tape over the leak to keep it from drawing moisture until I can get it worked on. I just don't want to make a mess of it and since It's my project, (and mess) and I don't want to push any more research off on someone else than I need to.
|
|
|
|
Post by ckfan on Jun 10, 2021 0:05:30 GMT
Chris is right, it needs to be evacuated and sealed up soon so that acids don’t form in the system and wreak all kinds of havoc. Nice little ball top you have there. It seems like you are willing to read and learn which is half the battle. As far as keeping the float goes, I would recommend keeping it. They work well unless garbage has found it’s way into the float seat. More than likely it’s fine. I’ll defer to the experts as far as how to solder it back up is concerned.
Oh, and to hook up your refrigerant manifold to it, you will need a hermetic service kit to go between the port on the fridge and your hose. Don’t know if you knew that yet or not. The 152a is just as simple as getting a self piercing can tap meant for R12 cans and some air duster.
|
|
earlg
New Member
Posts: 48
|
Post by earlg on Jun 10, 2021 1:42:50 GMT
I bought a little vacuum pump today, so it should be here in 2-3 days. My brother had an old set of refrigeration gauges he brought down, and last year when I got that CA machine going I did get a set of those Imperial valves from an old refrigerator guy here in town. He wants nothing to do with one of these things, but said I could have that old valve service kit. He said "Gosh Earl, I started doing this in the 1960's. How old do you think I am?" He was being funny, but said that he really never had to do much serious work on one of them.
As long as I don't have to go down the capillary tube scenario, I think I can manage the rest of it. You guys can poke fun at me in the meantime. Years ago my sister told me that it would impossible for anyone to be as dumb as I look, so there is that... And I'm sure I worked hard for that comment.
I did get some primer on the cabinet, legs and door. That's a little more in my wheelhouse and at least that much of it will look nice. I wonder on these little balltop machines if they actually used that Glytol paint on the cabinet and door? It sure acts a lot like the paint that's on the business end of one of these. And it sure has a lot of chips on the edges and on the bottom and top of the doors, et. I haven't noticed that so much on the more expensive models. I priced a gallon of that last year and they wanted something like $280 for it. If there was a paint store near here that carried that product line I think it would be about half that but I'm not sure. It would be nice to find the spec sheet on that and see what's in it for solids. It's some sort of oil base, (probably linseed oil) as lye will dissolve it and it does tend to yellow. With all the smoking that was going on in those days most people would have just laid the blame on that or cooking grease. If you put some lye in hot water and wash one of these things off (with rubber gloves and goggles of course) You'll be surprised at how much they will brighten up. You don't want to get carried away though as it will soften the paint and you just want to get what's oxidized on the surface off. Practice on the back, bottom and insides of the legs.
|
|
|
|
Post by ChrisJ on Jun 10, 2021 1:45:27 GMT
I can't imagine anyone poking fun over that.
We've all been there....
|
|
|
|
Post by elec573 on Jun 10, 2021 2:53:05 GMT
I’d recommend some of coldspaces posts . He had some excellent videos and pictures on ball tops . Just a suggestion the bottom tends to rotten away on the ball tops .
So I would check it out. These were one of the cheapest Ge fridges at that time.
|
|
earlg
New Member
Posts: 48
|
Post by earlg on Jun 10, 2021 17:03:39 GMT
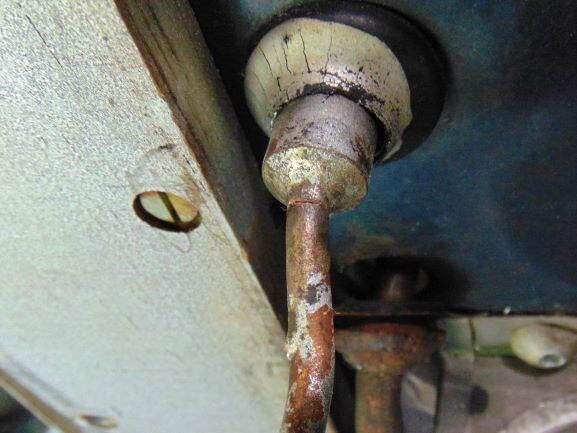
Holy cow I have been reading through your posts and watching videos the last couple of days. I am getting some of the procedure sorted out. Here's a picture of the source of my problems. It's a little out of focus, but that thing has settled down enough that I can get a picture of it not. That smell reminds me of one of those stinking pots in Yellowstone that makes one wonder why they wanted to see in in the first place!
Those guys in the 30's sure liked aluminum paint as well. I have sure washed a lot of that stuff out of old radio cabinets before refinishing them. It's interesting to see it here on these as well.
The way this has cracked, I am thinking that it needs to be pulled out of there and a new piece of copper line added to the original one. There really isn't any extra tubing used here. I did catch where David says the liquid stay clean flux needs to be used and I do have the silver solder they sell. And, at what point is the repair to this area made? I probably missed that but I really have been reading through as much of this information as I can. It's been really hot here this entire week, and I'm sure the guy that I talked to about this yesterday here in town has his plate full with air conditioning calls and doesn't have any spare time to devote to this sort of a project. |
|
|
|
Post by ckfan on Jun 10, 2021 23:16:11 GMT
Yeah, you can see right where it cracked. I’m no expert but I would think you could solder that back up no?
|
|
earlg
New Member
Posts: 48
|
Post by earlg on Jun 11, 2021 1:13:10 GMT
It looks to me like I need to replace that short section of tubing between where it's cracked, and where that swaged tubing comes out of the evaporator. I'm just not sure if this is when I need to do that. I bought a piece of tubing and have solder, but I didn't have the liquid stay bright flux and couldn't find any in town so I had to order some. It looks like a really weak spot there, even if it were soldered over. It's not leaking anymore so I can at least stand to be around it now, so is this when that sort of operation is done, or do I need to do something else? I am sorry that I'm so dense on this subject, you guys have really been helpful and I appreciate that a lot. I also posted some pictures of the two style legs, the standard size and the legs from that balltop. I got some paint sprayed on the cabinet, legs and door this afternoon. I have one other cabinet I'm refinishing for a friend of mine, but I don't have room to do both of them at the same time. I'm in the middle of refinishing three Edison phonographs and a 20's Stromberg Carlson radio and stand but the grain filler hasn't shown up yet, so they can wait. 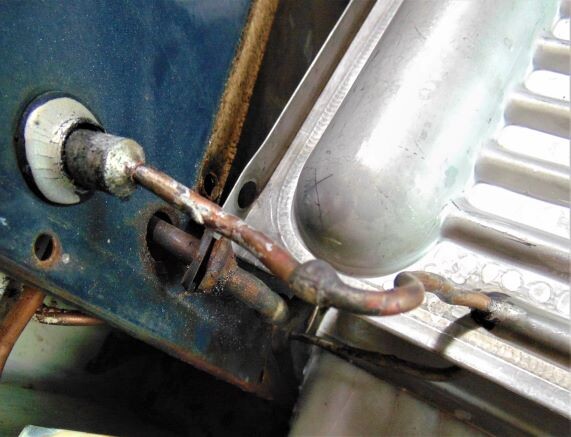   |
|
|
|
Post by ChrisJ on Jun 11, 2021 13:19:52 GMT
If you can get the system filled with nitrogen to get all of the air out, which you should do anyway because I'd bet there's already corrosion going on it may be worth cleaning that area and trying to braze it. I'd bet you could cover that crack with stay-silv 15 and it would stay fixed. However, I'd like to know what coldspaces thinks. He brazes a whole lot more than I do. |
|
earlg
New Member
Posts: 48
|
Post by earlg on Jun 12, 2021 15:30:10 GMT
I did get it covered with that Stay Brite silver solder this morning. I got up early and practices on some copper pipe until I was used to how that stuff flows out. It seems to be a solid joint, so hopefully it will be good enough for now.
I did get a small bottle of nitrogen yesterday and my brother thinks he has a regulator that should work for it. I've kept that crack taped over except for one when I took those pictures, so that should have helped on keeping moisture out. That aluminum tape works for paint remover, and it seems to have stuck well to that tubing. I'll get the wiring harness soldered in there now (which is really all I planned on doing of course) and from the way I understand it, I should put a little pressure in the system and test my solder joint for leaks. Then I can put the vacuum pump on it to remove what's left of the refrigerant in there.
|
|
|
|
Post by ckfan on Jun 12, 2021 16:47:55 GMT
Glad you got it sealed up. I would think you would pull the rest of the SO2 out first and then add nitrogen to test for leaks. Again, I’ll defer to the experts here.
|
|
|
|
Post by ChrisJ on Jun 12, 2021 18:19:18 GMT
If it was me, I'd pull a quick vacuum and then fill with nitrogen to just under the low test pressure and check for leaks.
Once I was sure it was tight pull anther l another vacuum, fill with nitrogen and pull another vacuum. The last one I'd want to get down to 250-300 micron.
Try to make sure the float is laying in a way that it's open.
|
|
earlg
New Member
Posts: 48
|
Post by earlg on Jun 14, 2021 1:25:57 GMT
Thanks you guys for your help on this thing.
I got the wires in there and repainted those aluminum boards around the top that holds everything together. GE really wasn't planning on anyone needing to do much in there or at least not ever taking those four boards off. Someone was in there at one time or another as some of the screws were missing around the rim and when I was replacing all of those screws I can understand why. Holy cow the one's at the back are nearly impossible to get a nut on. My arms are just too big for that sort of work. Also, there are two sets of screw holes in 6-8 places where they couldn't get the screw to start through the sheet metal so they drove a new hole and used that one instead of figuring out where the hole went. Must not have had an ice pick laying around. Also, the screws around the perimeter are three different lengths, and that doesn't make sense. Especially as particular as GE seems to have been in those years.
So, I guess I'll find out how the rest of this mess I've made goes. It's certainly been a learning experience and I am really amazed at all of the knowledge of these old refrigerators that you guys have and how much of it you'd had to learn in the last 10 or so years. I read through all of the things you guys went through on that 30 or so page post on refrigerant gasses. That's definitely the work of someone that really is interested in and likes what they do and are learning. Those guys sure went through a lot of cigarettes and coffee figuring this stuff out 90+ years ago now, that's for sure.
Somewhere around here I have some GE stuff from the late 20's that I've had for a long time. I think it was to do with teaching how refrigerators work in a classroom setting. But I just can't remember off hand. It doesn't have much to do with these refrigerators I'm working on right now and it's unlikely I'm going to get tangled up with anymore at this point and I'm certainly not going to get an older one. Those DR units sound like they have a lot of issues that are way beyond me at this point. And if nothing else I'll get this thing repainted so it will make a nice looking corpse until someone that can sort it out comes along...
|
|