|
|
Post by turbokinetic on Aug 11, 2018 13:28:20 GMT
I was able to catch a glimpse of the markings on your relay, and attempted to screenshot it here. The word "TOP" is boxed in red. Your thumb partially covers it. The red arrow is the end which needs to stay up. The small end is the top; not the side with the writing printed on it.
Hi David Thanks for the info ! It’s great help considering I haven’t clue what the insides look like. The only relays I’ve ever seen apart are the newer ones with the round disc inside and know when it breaks you get a rattle. Also thanks for doing the pic of relays orientation. I did notice the “top” marking on the relay casing and made sure to put it back exactly the same way. The MT I’m getting is CA. And yes I did see your post and vids of the CK :-). I’m glad you were able to save it from going to scrap. I can’t stand seeing any vintage appliance going to scrap. I’d save them all if I could.
LOL yeah I had to open mine because it was full of mud dauber nests!
|
|
|
|
Post by ajc31980 on Aug 11, 2018 13:37:12 GMT
You would have to be creative and find a way to make a shaft adapter to possible make your original knob work. The adapters they sent should all be brass and easy to solder to with Stay Brite I have not tried to adapt one like it myself. I was not a fan of solid stat relays because they need to cool off before they will cycle again. However if you read the RO81 package it tells us that it has a special overload the is made for cap tube systems. When it trips it stays off about 4 mins giving time for the system to balance. That I like as it also lets the relay cool down so it will do its job. I have opened the RO81 just to get the overload to use and scraped the relay. Good source for an overload for a small HP compressors. Hi coldspaces I’m sure the knob will bug me enough to come with some idea of how to use the old one. Out of the adapters that came with the new control. You’d think one of them would have worked. Also thank you for the additional info on the relay. |
|
|
|
Post by ajc31980 on Aug 11, 2018 13:51:37 GMT
Hi David Thanks for the info ! It’s great help considering I haven’t clue what the insides look like. The only relays I’ve ever seen apart are the newer ones with the round disc inside and know when it breaks you get a rattle. Also thanks for doing the pic of relays orientation. I did notice the “top” marking on the relay casing and made sure to put it back exactly the same way. The MT I’m getting is CA. And yes I did see your post and vids of the CK :-). I’m glad you were able to save it from going to scrap. I can’t stand seeing any vintage appliance going to scrap. I’d save them all if I could.
LOL yeah I had to open mine because it was full of mud dauber nests!
I think later on today. I’ll attempt take the relay apart just to get a look at things . Hoping just the contacts need cleaned up. It does have the rivet you mentioned. So I’ll have to drill it out. Guess I’ll be voiding the warranty by Breaking the seal lol Also here’s a better look at the relay.  |
|
|
|
Post by turbokinetic on Aug 11, 2018 14:15:09 GMT
LOL yeah I had to open mine because it was full of mud dauber nests!
I think later on today. I’ll attempt take the relay apart just to get a look at things . Hoping just the contacts need cleaned up. It does have the rivet you mentioned. So I’ll have to drill it out. Guess I’ll be voiding the warranty by Breaking the seal lol Also here’s a better look at the relay.
LOL! We'll have to send you an "I void warranties" tee shirt! LOL!
Seriously, I think they are talking about the "seal" of red glue on top of the overload adjustment screws. If I understand, that isn't really about the relay its self; but more about the larger investment GE had in the 5-year hermetic compressor warranty. If you remove the sealing glue and turn the overload screws, you can burn the compressor, and therefore GE wouldn't pay for that very costly damage.
That's just how I see it; and how things work in the field where I work now. 
|
|
|
|
Post by turbokinetic on Aug 11, 2018 14:21:03 GMT
You would have to be creative and find a way to make a shaft adapter to possible make your original knob work. The adapters they sent should all be brass and easy to solder to with Stay Brite I have not tried to adapt one like it myself. I was not a fan of solid stat relays because they need to cool off before they will cycle again. However if you read the RO81 package it tells us that it has a special overload the is made for cap tube systems. When it trips it stays off about 4 mins giving time for the system to balance. That I like as it also lets the relay cool down so it will do its job. I have opened the RO81 just to get the overload to use and scraped the relay. Good source for an overload for a small HP compressors. That Stay Brite is some amazing stuff. I have found it so much more useful beyond the original repair to Andrew's CK for which it was purchased. Thanks for recommending it, as well! I was able to repair the door handle mechanism on the Westinghouse Deluxe with it.
For the original knob, I wonder what the back of it looks like? I have not seen his style control up close. I know that the CK control seems to have the temp knob splined onto a very short shaft. I wonder if he could drill the knob bore deeper; and add a side hole for a setscrew - thereby allowing use of one of the Ranco adapters?
|
|
|
|
Post by ajc31980 on Aug 11, 2018 20:47:44 GMT
You would have to be creative and find a way to make a shaft adapter to possible make your original knob work. The adapters they sent should all be brass and easy to solder to with Stay Brite I have not tried to adapt one like it myself. I was not a fan of solid stat relays because they need to cool off before they will cycle again. However if you read the RO81 package it tells us that it has a special overload the is made for cap tube systems. When it trips it stays off about 4 mins giving time for the system to balance. That I like as it also lets the relay cool down so it will do its job. I have opened the RO81 just to get the overload to use and scraped the relay. Good source for an overload for a small HP compressors. That Stay Brite is some amazing stuff. I have found it so much more useful beyond the original repair to Andrew's CK for which it was purchased. Thanks for recommending it, as well! I was able to repair the door handle mechanism on the Westinghouse Deluxe with it.
For the original knob, I wonder what the back of it looks like? I have not seen his style control up close. I know that the CK control seems to have the temp knob splined onto a very short shaft. I wonder if he could drill the knob bore deeper; and add a side hole for a setscrew - thereby allowing use of one of the Ranco adapters?
Here some pictures of the knob. And adapters that I have left. I really wish the adapter with the screw head was one that was made to except a center screw cause it would be perfect for the original control. As for the relay. I’m going to be tackling that shortly. I’ll Make sure to take pics and post them 😁       |
|
|
|
Post by turbokinetic on Aug 11, 2018 20:59:36 GMT
That Stay Brite is some amazing stuff. I have found it so much more useful beyond the original repair to Andrew's CK for which it was purchased. Thanks for recommending it, as well! I was able to repair the door handle mechanism on the Westinghouse Deluxe with it.
For the original knob, I wonder what the back of it looks like? I have not seen his style control up close. I know that the CK control seems to have the temp knob splined onto a very short shaft. I wonder if he could drill the knob bore deeper; and add a side hole for a setscrew - thereby allowing use of one of the Ranco adapters?
Here some pictures of the knob. And adapters that I have left. I really wish the adapter with the screw head was one that was made to except a center screw cause it would be perfect for the original control. As for the relay. I’m going to be tackling that shortly. I’ll Make sure to take pics and post them 😁 Yeah, that short splined control shaft does look like the one on the CK control. I think what coldspaces was suggesting was to remove the shaft from the original control, and then solder it to one of the adapters so that it will connect to the Ranco control, and then support the knob.
Hope the relay repairs are successful!
|
|
|
|
Post by ajc31980 on Aug 11, 2018 22:06:39 GMT
|
|
|
|
Post by turbokinetic on Aug 11, 2018 22:24:51 GMT
That looks like new compared to the mud dauber nests in mine! Although the contacts do look very arced out.
|
|
|
|
Post by ajc31980 on Aug 11, 2018 23:27:15 GMT
Ok test run time. I cleaned the points up with a small metal finger nail file and then a foam swab (for electronics) with some alcohol. I wasn’t able to get them smooth but they look better. There arching is minimal. Here’s a short vid of the first test run. This a um... don’t try this at home kids deal .. lol youtu.be/_ZdCsBRmcTs |
|
|
|
Post by turbokinetic on Aug 11, 2018 23:56:44 GMT
Ok test run time. I cleaned the points up with a small metal finger nail file and then a foam swab (for electronics) with some alcohol. I wasn’t able to get them smooth but they look better. There arching is minimal. Here’s a short vid of the first test run. This a um... don’t try this at home kids deal .. lol youtu.be/_ZdCsBRmcTsYeah, that should be good for a long while!
EDIT: Actually, Kids - Do try this at home, with supervision. We need more kids to show interest in things like this. Kids not trying things at home anymore is a major part of the problems our country is having.
|
|
|
|
Post by ajc31980 on Aug 12, 2018 0:24:27 GMT
Ok test run time. I cleaned the points up with a small metal finger nail file and then a foam swab (for electronics) with some alcohol. I wasn’t able to get them smooth but they look better. There arching is minimal. Here’s a short vid of the first test run. This a um... don’t try this at home kids deal .. lol youtu.be/_ZdCsBRmcTsYeah, that should be good for a long while!
EDIT: Actually, Kids - Do try this at home, with supervision. We need more kids to show interest in things like this. Kids not trying things at home anymore is a major part of the problems our country is having.
I really hope it does last a along time ! 😁 And I agree. I think that kids today should do more projects at home . When I was a kid/teens I was always messing around fixing something. Mostly electrical/ electronics. Or I was out and about getting into trouble lol. I think I may order a supco relay just to have on hand. Just in case my luck changes as it did with thermostat. Although I haven’t given up on the old thermostat totally. It’s getting stashed away for a rainy day project. Lol. Something in the back of my head keeps saying I need to play with the adjustments more when I have a good bit of free time. Like the middle of winter when I’ll be board out my skull lol. |
|
|
|
Post by coldspaces on Aug 12, 2018 1:46:53 GMT
If you could grind off the slotted part on the first adapter you held up and then drill and tap it? I have extra of those if you mess it up.
|
|
|
|
Post by ajc31980 on Aug 12, 2018 3:37:20 GMT
If you could grind off the slotted part on the first adapter you held up and then drill and tap it? I have extra of those if you mess it up. That’s a great idea ! I don’t have have any tools for grinding or for taping threads so it’ll give me an excuse to go out and buy some new toys.. um oh I mean tools lol. 😉 Also I have everything back together and the fridge seems to be happy again. |
|
|
|
Post by ajc31980 on Aug 17, 2018 0:41:45 GMT
Ok. So the saga continues . Ugh ! The overload still randomly trips on start up. I’ve ruled out the thermostat as being the culprit. Because it did this with the old one and still does it with the new one. Plus it’s off time is 11 to 12 min now. So it’s not like it’s try to turn back on to quickly. I checked the compressor resistance today. I’m pretty sure I have my wires right as far as what they represent. White = start. Green = run Black = com White to green  White to black 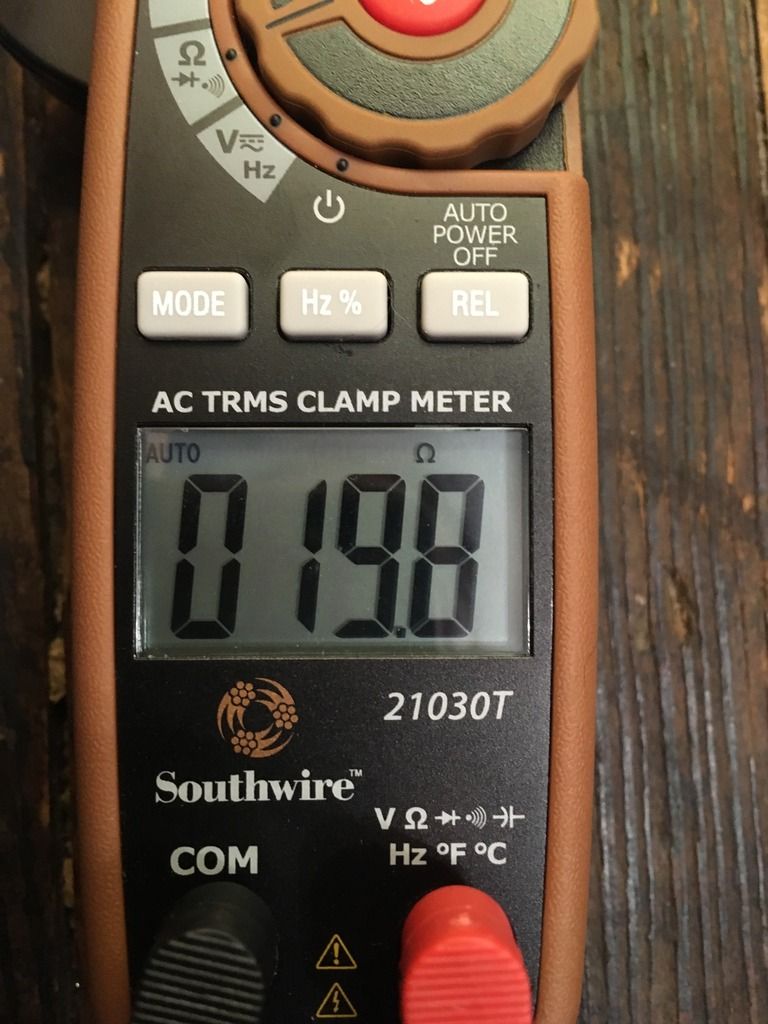 Green to black 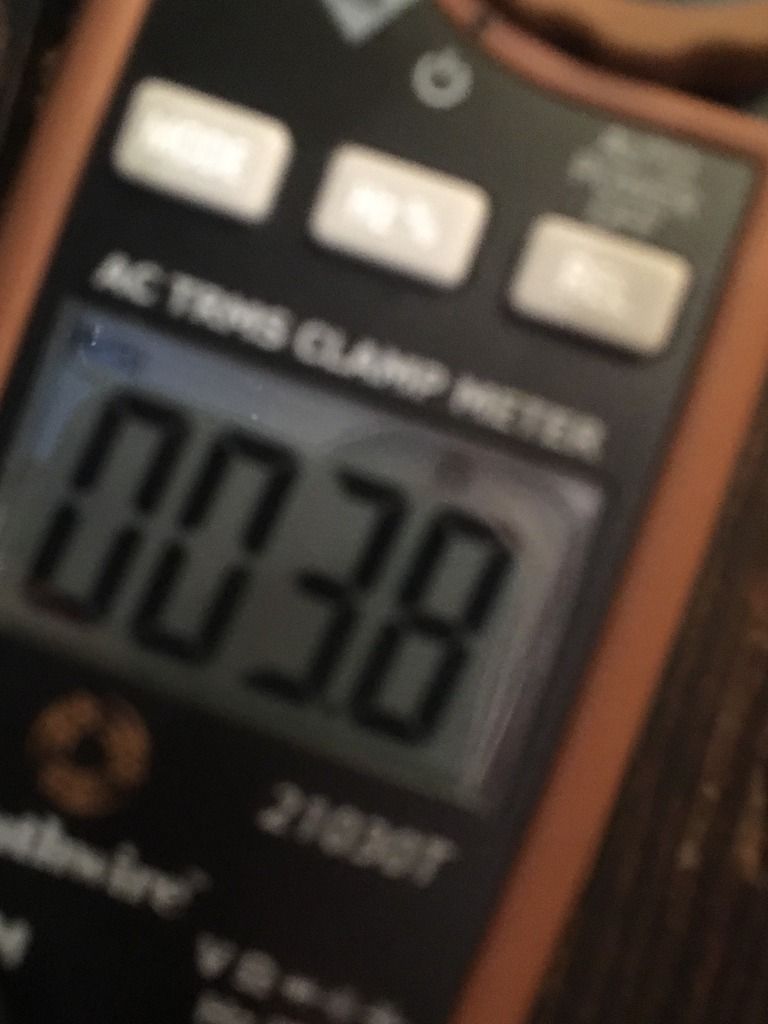 I ordered a supco relay and intend on installing it per @turberkinetic advice on leaving the original overload in the circuit I should have the relay in the mail tomorrow. Wish me luck. I’m still choosing to look at this project as a learning experience lol. And I really hope this clears things up for along time ...... this fridge project has been like a roller a coaster with all the ups and downs... I’m getting my CA on Sunday an know it’s going to tend steel all my attention lol Thanks for everyone’s advice and help. AJ |
|