|
|
Post by turbokinetic on Jun 22, 2021 13:03:35 GMT
I will have to look into getting one of those micron gauges eventually. I did look into them a little bit after you mentioned it, and they do make some really nice equipment. I'm sure after I get through this one and really grasp what all needs to be done with this one, I'll be a little more confident about how far down this rabbit hole I have any business being in! LOL it's not a matter of how far you want to go down the rabbit hole.... you go down the hole as far as necessary to locate the rabbit... the frosty frozen rabbit! I believe that's a case of apathy. Been in the field too long and the excitement has worn off. Really sad when you think about it. I would hate to have a job where I didn't find my career subject matter exciting and engaging any longer. That's un/fortunate... unfortunate because it leaked and requires a re-do - but fortunate that it did this now and not after you had it charged and back on the cabinet!  I hope you'll drill out the line and start completely over fresh with a new piece to keep from having any solder joints right at that stress point at the bottom of the float. I am really sure that drilling the line out is your only feasible path forward. It does post a bit of a safety concern if this line breaks off completely in operation, which is a possibility if the repairs aren't done correctly. |
|
earlg
New Member

Posts: 48 
|
Post by earlg on Jun 28, 2021 0:43:46 GMT
It might be a frozen rabbit, but it really suffers from the "unwanted guest" Man that thing has bad breath! I know what you mean about apathy, but he's not even 30 yet. He's going to have a long 30 years in his trade if he's already lost all curiosity about it. My one brother says there's a reason why a guy can work in a coal mine for 30 years and never look up and notice what color the walls are. He's probably in that camp. On a brighter note, I did buy a pump from a young guy yesterday that's learning to be a machinist at John Deere down in Waterloo. He spent about 2 hours showing me a couple of old hit & miss John Deere engines he's working on, a jet ski and a few other things. He is really enthused about learning how to be a machinist and I told him to corner a few of the old guys that are there and pick their brains. When they closed White Farm in Charles City which used to be the Oliver many years ago they sold off machinery that was over 100 years old for 15-20 cents a pound and all that knowledge is pretty much gone now. A gear punching machine my Dad ran in the 30's up to WWII was still being used there and Dad thought it was 100 years old when he was running it! He used to say that they paid him 25 1/2 cents an hour and they let him work 90 hours a week. So, this is how my somewhat messy repair turned out. I put about 70 pounds of pressure in it, and I'm not making any soap bubbles anywhere so that's good to see. I'm really glad of that to be honest. I have to change the oil in that pump and then I can see what that thing can do. I know the Robinair people say I need to use the oil they sell, but it must be pretty much the same oil that gets used in any other vacuum pump isn't it? And one other thing, since I'm having the time of my life with this project, should it also have one of those filter driers put in it before it gets charged? You guys can let me know what you think. I really appreciate the advice and don't feel like you are going to hurt my feelings about whatever you want to get after me about on this. I'd much rather get it figured and sorted out now, than have to take it all back apart after it's painted and back together. 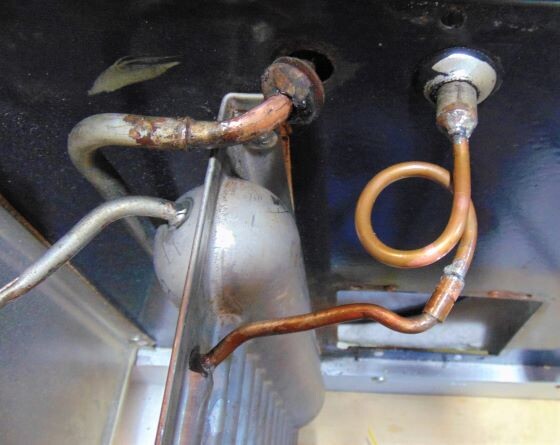  Last but not least is this tiny Globe Top that's in Chicago for sale right now for $1,000. Thought you'd get a kick out of a picture of the little guy.  |
|
earlg
New Member
Posts: 48
|
Post by earlg on Jul 5, 2021 19:22:40 GMT
On that unit yesterday I put the pump on it and kept it at -30 for about 7-8 hours and I went over it with my heat gun a couple of times and got the whole thing quite warm to hot. I have a small electric heater and I can put it in a large box and get the whole thing really warm with that pump as well. I can do that on Saturday as I kind of want to be around it while I'm doing that. It seems like I'm on the right track with it and when the pump is running, my cat doesn't seem to be too concerned so whatever smell there is, it can't be much. I am to the point where I see the thing and think I'm smelling that stuff. I read in some of those books where they heated those things up with those gasoline blow torches back then to chase out the moisture! I could do it that way, but I think the heat gun and then heater should be ok. Those gasoline blow torches are good when your neighbors wonder what you are doing and you want them to leave... With the cabinet I agonized over how to deal with the legs on that cabinet and this is what came to mind. I'm actually like how it turned out. I got a couple of pieces of 3/16" steel an inch wide and fitted that around the base under the legs. It's not perfect, but it really seems to have given the base some extra integrity without adding a great deal of weight. And since the porcelain cabinets have the black striping around the legs and a black edge around the base, it doesn't look stupid to me. My Mom and Brother think I should have gone with dark blue, I don't have any blue lacquer around or I might have tried that. I am also not going to rub out the lacquer to a really high gloss. It looks fine like this and if I try to make it too shiny, it's just going to show some of the bouncing around it's taken over the years. I don't think they were a high gloss when they were new, but maybe I'm wrong on that. 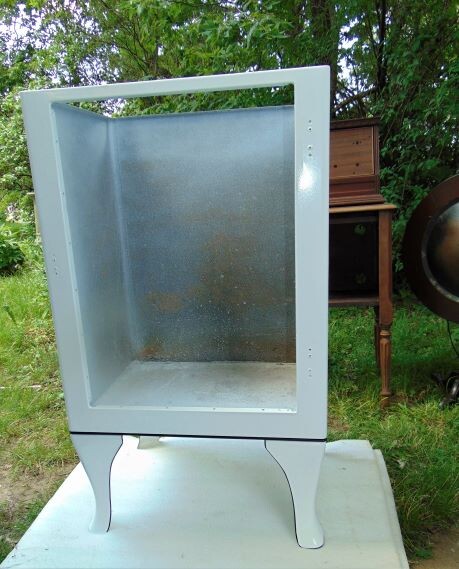 |
|
|
|
Post by turbokinetic on Jul 6, 2021 13:15:16 GMT
It's looking good! I bet the repaired line will last quite a while with the strain relief loop in it. Should be able to "turn that one in for grade" so to speak.
I can't say I've ever seen a short CG cabinet like that! It's definitely cute, but not $1000 worth of cute LOL!
The bottom reinforcement job should be a good repair, too. Will keep the cabinet from taking further damage around the leg mounting points.
As for a filter-drier, I wouldn't be too concerned about it since you've done a heated evacuation on it for 7 hours. The drier needs to be in the liquid line between the condenser and float valve, so it would require a much more major disassembly to install, than you have had to do already. I always install one when the unit gets a capillary tube conversion, since that provides positive filtration immediately before the cap tube. However, the float valve has a screen in the inlet already.
|
|
earlg
New Member
Posts: 48
|
Post by earlg on Jul 15, 2021 19:51:31 GMT
I am really glad to say that this CG machine seems to be running fine! I put a little short of two cans of that duster spray in it and I did see where David mentions that in these systems it's easier to let some of the refrigerant out, than to try and add more but the frost line seems to be about right from what I've been seeing.
It really developed a frost line quickly on the evaporator and is about 2/3rds to 3/4ths up the side of the header and all of the rest of the evaporator is covered with frost after about 10 minutes running in the open. It's funny that they only used half of the icing unit on those machines but it is cooling a fairly small space.
It's running very quietly as well, but I only let it run for about 15-20 minutes. I'll have to hunt up my Kill a Watt meter and see how much current it's pulling. I'll also post some pictures of how it's frosting up but I'll have to lift it up off the stand I have it on as the sides are in the way. This just amazes me that it seems to be working like it should. You guys sure have been great in helping me with this.
|
|
earlg
New Member
Posts: 48
|
Post by earlg on Jul 15, 2021 23:33:34 GMT
The Kill a Watt thing says that when I first start that machine it pulls around 220 watts and then it settles down to 180 fairly quickly and after a few minutes it was around 165 and seems to go up and down a little bit from that but not much. I have one of those cheap laser thermometers and it reads from about 5 degrees to -4 depending on where I aim it at on the evaporator. It gets cold really quickly and this picture is after it's been running about 10-15 minutes. It's very humid here in North Iowa today it rained hard yesterday and the corn is really growing! I have a feeling I might have a little too much refrigerant in it, and this is about the best picture I have of the frost line right now. You can let me know what you think, and if you'd like more or better pictures I'll be glad to take them.  |
|
|
|
Post by ckfan on Jul 16, 2021 11:15:08 GMT
That looks good. I’m glad it’s working well for you.
|
|
|
|
Post by turbokinetic on Jul 16, 2021 11:26:10 GMT
The Kill a Watt thing says that when I first start that machine it pulls around 220 watts and then it settles down to 180 fairly quickly and after a few minutes it was around 165 and seems to go up and down a little bit from that but not much. I have one of those cheap laser thermometers and it reads from about 5 degrees to -4 depending on where I aim it at on the evaporator. It gets cold really quickly and this picture is after it's been running about 10-15 minutes. It's very humid here in North Iowa today it rained hard yesterday and the corn is really growing! I have a feeling I might have a little too much refrigerant in it, and this is about the best picture I have of the frost line right now. You can let me know what you think, and if you'd like more or better pictures I'll be glad to take them. That frost line looks pretty well normal! I can see it's frosting slightly on the return line, which if that progresses too far back to the compressor can indicate an overcharge. But that would raise the temperature and cause other symptoms. So, I don't think you have a problem there! Glad it's coming back together for you! |
|
earlg
New Member
Posts: 48
|
Post by earlg on Jul 17, 2021 0:12:17 GMT
I must have done something stupid. It ran just fine the 4-5 times I started it up yesterday, and it ran fine this morning for a little while before I decided to put it all back together and then I was going to put some cardboard around it to see if it would cycle off, and now it's stalled for some reason. I thought maybe I jarred a wire loose or broke it off the connection inside, so I took it all apart again and everything looks like it should, but it doesn't want to start for some reason. I left it sit about an hour before I tried it so I'm really stumped on this one.
The start relay is acting like it should and there isn't any arcing happening. I didn't put power to it for more than 2-3 seconds at a time, and I haven't pestered it that way more than 8-10 times. When I put my ear up to the corner of the case, the motor sounds like it's getting power. I'll let it sit overnight and see if it does the same thing in the morning, but I thought maybe I'd see if you guys had any thoughts on this one?
This is certainly been an education for me, that's for sure!
|
|
|
|
Post by ChrisJ on Jul 17, 2021 17:04:06 GMT
Are the start contacts actually giving the start winding power?
|
|
earlg
New Member
Posts: 48
|
Post by earlg on Jul 17, 2021 19:54:11 GMT
It seems to be energizing the start windings like it should. I haven't left the power on for more than 2-3 seconds, but if I manually hold the points open and then let them close the watts jump up to around 200 and then I shut it off. It seems to jump up to about 80 in the same time if I hold them open. I've checked my wiring against the diagram in the manual, and it's the same as is described there. And there is continuity to all the points, so I'm kind of stumped on this one. And I haven't had it powered on long enough to trip the overload in the switch unit, or to trip the circuit breaker or anything like that. And after I got it all back together and first turned it on I realized right away that the motor wasn't running and I shut it off right away. If that was longer than 2-3 seconds, it couldn't have been by much. I did read where most of the troubles with these things not running is in that switch unit, but that really seems to be doing it's job as near as I can tell.
I'll probably set it aside for awhile as I have other stuff I need to get done and I've spent a lot of time on this for now. So much for just having to re-wire and paint it so it looks decent. Haha! Anyone that's worked on old stuff knows how those plans can go haywire. I have some old Edison cabinets and a 20's radio that I need to get some finish on as they've been bare wood for long enough.
|
|
|
|
Post by turbokinetic on Jul 17, 2021 20:54:16 GMT
It seems to be energizing the start windings like it should. I haven't left the power on for more than 2-3 seconds, but if I manually hold the points open and then let them close the watts jump up to around 200 and then I shut it off. It seems to jump up to about 80 in the same time if I hold them open. I've checked my wiring against the diagram in the manual, and it's the same as is described there. And there is continuity to all the points, so I'm kind of stumped on this one. And I haven't had it powered on long enough to trip the overload in the switch unit, or to trip the circuit breaker or anything like that. And after I got it all back together and first turned it on I realized right away that the motor wasn't running and I shut it off right away. If that was longer than 2-3 seconds, it couldn't have been by much. I did read where most of the troubles with these things not running is in that switch unit, but that really seems to be doing it's job as near as I can tell. I'll probably set it aside for awhile as I have other stuff I need to get done and I've spent a lot of time on this for now. So much for just having to re-wire and paint it so it looks decent. Haha! Anyone that's worked on old stuff knows how those plans can go haywire. I have some old Edison cabinets and a 20's radio that I need to get some finish on as they've been bare wood for long enough. That is strange and very frustrating that it seems to be stuck! I don't think you have damaged it by the run attempts you made on it. When these have sit open to the elements sometimes corrosion forms in the mechanical parts. It may need to be boosted with a higher voltage to get it going again. Then once it's run for enough hours it will be fine again. Another possibility is a stuck unloader. That again will correct its self usually with usage. |
|
earlg
New Member
Posts: 48
|
Post by earlg on Jul 18, 2021 0:59:23 GMT
I kind of wondered about the un-loader with what little bit I understand about these things, it does make sense that if it's stuck for some reason, it would make it hard for the motor to start. It wasn't acting strangely when it was running and when I shut it down it seemed to coast to a nice stop. It's aggravating, but I'm not completely discouraged about it. All the old guys I used to know that would take up an interest in something like this around here are gone now. My brother has a good friend that knows much more about electric motors than I do and I'll see if I can get Rick to try and jump-start the corpse!
This morning I did hook the vacuum pump back up to it and pulled it down into a vacuum for a few hours and then re-charged it again thinking that might do something, but it didn't. I'll stop pestering it for now before I do burn up a winding or mess up that switch unit. These can be fickle animals I guess, and I sure do have a lot of respect for you guys and how much work you put into these things. It's too bad GE didn't put a little forethought into how they got re-wired, but I guess that was a long way out into the future and here we are. The CG machines would have been much easier to get into if that top plate were in two pieces. Or if I had arms like soda straws to get between the plate and the bottom of that housing.
Thanks again for all of your help and advice. I'll keep you posted on this thing, but it might be a few weeks before I have time to do much else with it.
|
|
|
|
Post by turbokinetic on Jul 18, 2021 11:35:49 GMT
I would think that if the charge was removed from the unit, it would start up fine even with the unloader not working. I'm betting my money on some corrosion in the mechanical parts. If you can get it running again, it should be let to run for hours before stopping.
|
|
earlg
New Member
Posts: 48
|
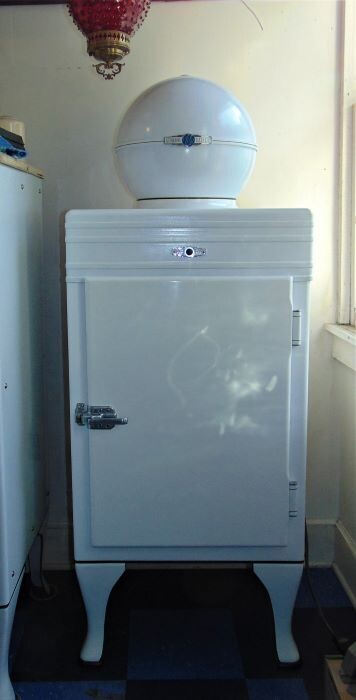
Post by earlg on Sept 26, 2021 14:57:42 GMT
Well, I thought my camera was broken but it turned out that it just does not like rechargeable batteries. My brother told me to see if that was the problem, and that must have been the case since it's working now. Anyway, I know it's been awhile and you guys like to know how things turned with these projects. This whole summer has been nuts, and I haven't had as much time to work on anything as I would have liked. In the meantime, since this machine refused to start back up after sitting overnight another one turned up with the whole bottom rusted out. If it hadn't been sitting in dirt in the shed it was in, it would have tipped over. One leg was completely rusted off, and the other three were sort of still in place. However, it runs like a champ after I rewired it! It's been running for about a month now, and I got the hardware back from the platers yesterday so I figured I'd wait until that stuff got back before I posted anymore pictures. It's all repainted now and I'm quite happy with it. Here are a few statistics about it from the Kilawatt meter thing. I used .025 kWH as the multiplier for cost.
22 cents a day $1.55 per week $6.65 per month $81.03 year.
When it first starts it's around 169 watts and drops down to around 130-135 watts when it shuts off. I have not timed the cycles as it's quite hard to hear and I got bored with that whole process. That meter needs to have an led light on it that lights when they thing you have plugged into it is pulling current.
Overall, I'm really quite happy with it. When it's really humid out, it does sweat around the door a little bit. Especially on the hinge side and it has sweated a little bit on the door in the image where the wood frame on the inside of the door rests. I have kept it around 35 F. inside. I don't have central air in my house (after roasting all day in a UPS truck, everything else seems pretty comfortable) so when it's really hot out I will turn a small fan on to keep it from doing that. There is such a small distance from the liner in relationship to that textolite strip is what I'm guessing the the culprit on that. And the way the door has the porcelain nearly against the steel door frame, where on the larger machines it has textolite there as well. Most of you guys have been around these things a lot longer than me, so you may have more informed thoughts on that one.
So, here's a picture of it. I put a pinstripe around the headband and a couple on the hinge covers. They keep changing paint formulas for some reason and I had to do it a few times to get it to lay down the way I wanted it to.
|
|


 I hope you'll drill out the line and start completely over fresh with a new piece to keep from having any solder joints right at that stress point at the bottom of the float.