|
|
Post by danehenas on Aug 21, 2018 2:25:23 GMT
I have a DR (2-DE?) at my office (ca1928 best I can figure) that was working perfectly (for as long as I've had it for the last 40 years!) and a couple weeks ago it just decided to shut off. It did not lose it's refrigerant--no poison cloud--nothing like that. When you push the on-button, nothing happens. When you push it and hold it down, the blue resistor below the temperature knob gets real hot (I know, don't do that!). Any suggestions or a step-by-step troubleshooting guide? I've got a little multimeter and can do a little DIY troubleshooting. I took the control cover off so you could see the control. Please ignore the pennies that were glued to the little plunger thingie--the previous owner did that... don't know what function they served). If it's the blue resistor on the bottom left, does anyone have a source for those--or any other control parts for that matter? Thanks in advance and I'm glad you are out there!!!
|
|
|
|
Post by elec573 on Aug 21, 2018 3:26:23 GMT
Sorry to hear that it’s not working. It’s a beautiful looking fridge. It could be stuck , or the motor may have shorted out worst case scenario. Does the overload trip? One thing
about a tall control it’s easy to check the motor windings with an ohm meater . The terminals are on the back of the control. You we’ll have 3 run ,common and start I’ll have to look it up to tell you which terminals
they are . Or someone else may answer.
|
|
|
|
Post by birkie on Aug 21, 2018 3:36:40 GMT
Welcome to the forum! First of all, congratulations on having a DR serving you for 40 years. It's nice to hear stories like this, they really are a marvel of engineering As far as troubleshooting, can you be more specific about "nothing happens" when you push the on button? That is to say, do any mechanical parts move in the control? The sequence of events that is supposed to happen when starting the machine is as follows: 1. The main contacts close, causing a lot of current to flow through the run windings, and the that little starting solenoid behind the pennies. The motor remains stationary. 2. The starting arm moves up The high current through the starting solenoid causes the arm above it to move upwards, closing a set of contacts that allows current to go through the start winding by way of the resistor. The two magnetic fields of run + start get the motor to start spinning. As the motor increases in speed, the current through the windings decreases due to back EMF. 3. The starting arm falls back down. Eventually, the current through the run windings is not enough to hold the starting up, so it drops back down to its rest position, opening the start contacts so current no longer flows through the resistor and start winding The motor runs with all current going through the run windings and the start solenoid (but not enough current to lift it), until it gets cold enough that the control opens up the run windings, cutting off power to the motor. Right above the "on" switch is a long bimetalic strip with a heater next to it. Under normal running currents (and momentary, higher, start currents) it stays where it is. If there is too much current going through the motor, that wire will heat up and glow, causing the binetalic strip to slip off the plastic near the start switch, and turn the machine off. Here's the overload tripping on a machine. Notice that the start arm engages, but never disengages. That's why this one tripped. The end result was that the motor needed to be rewound: drive.google.com/file/d/1audKyabKAZIDT_XTaNqhg-dWoz_UteaI/viewThe pennies add additional weight to the start arm. Somebody probably added them because the start arm was doing what it did in that video (i.e. the start arm was not disengaging). It's a delicate balance that usually doesn't need fixing with pennies unless something major changes (like the re-winding the motor), and makes me a little suspicious about the state of the windings. But it has been that way for 40 years, so who knows. So - what part of the startup process is going wrong on yours? That could help diagnose the situation. |
|
|
|
Post by elec573 on Aug 21, 2018 4:14:47 GMT
Ok tried to post a picture but to large to post. So standing in back looking at control from back 3 motor leads are on the right . They are the larger wires.
The two smaller wires are for the heater or oil conditioner as ge puts it .These all come up through a hole in bottom of control. So starting from top on right of back of control is
the run winding , down a little bit is common and well also have one of the oil conditioner wires on that terminal. The bigger wire should be the common.
Lower by the hole where the wiring comes through the control is the starting winding. You we’ll need to pull them off one at a time and use your ohm meater to read them
to ground . Make sure to put them back where you removed them. Also the wiring is very old and can be brittle. Or mark the terminals and the wires so as not to mix them up
(very bad ) hope fully you get a high resistance reading. You we’ll also need to read from common to run, common to start ,run to start. You we’ll have to pull them off
for that so you we’ll have to mark them . Write down what you get on these . If you want to message me with your email I can send pictures of the back of control labeled
|
|
|
|
Post by elec573 on Aug 21, 2018 4:25:47 GMT
After looking closer at your picture of the control the starting resistor bottom left looks like it cooked? If that’s the case something caused that I’d still do the resistance reading
to rule out a shorted out motor.
|
|
|
|
Post by danehenas on Aug 21, 2018 17:33:45 GMT
Thanks for the replys! I wasn't expecting so many so fast! When I say it doesn't do anything, I mean you flick the on switch, it clicks, there's some mechanical switching happening but there's no spark. Here's a link to a video I shot: www.youtube.com/watch?v=MeFC2UKYA14&feature=youtu.beI'll bring my multi-meter in tomorrow to do the readings elec573 describes. Does anyone know anyone in the Sacramento area, or northern California who works on these? My email is dane@danehenasdesign.com |
|
|
|
Post by Travis on Aug 21, 2018 18:41:17 GMT
Take a look at the DR manual to get the right wires. Also look at your main contact. The control pictures in the manual will show those.
I’m not aware of anyone out west that will work on these. These are pretty much DIY, especially in environmentally paranoid CA. I wish there were more of us.
|
|
|
|
Post by turbokinetic on Aug 22, 2018 23:52:22 GMT
Thanks for the replys! I wasn't expecting so many so fast! When I say it doesn't do anything, I mean you flick the on switch, it clicks, there's some mechanical switching happening but there's no spark. Here's a link to a video I shot: www.youtube.com/watch?v=MeFC2UKYA14&feature=youtu.beI'll bring my multi-meter in tomorrow to do the readings elec573 describes. Does anyone know anyone in the Sacramento area, or northern California who works on these? My email is dane@danehenasdesign.com
Hi Dane. I will echo the others in saying I'm sorry you've had a failure with your DR.
The control is doing three things. It is acting as a thermostat to start and stop the compressor and maintain temperature. The main contact does this.
The second function, is to provide a signal to the motor's start winding, at the beginning of each run cycle. The motor has two separate sets of windings in it. The main winding is used all the time the motor is powered ON. The start winding is only active for an instant during startup.
The final function is motor protection. There is a function which will turn off the main contact, and stop current to the motor, if there is an overload or stalled condition.
In your case, there seems to be no motor humming, no sparking, nothing to indicate current flow. I have to ask, but you've verified there is power getting to the unit from the electrical outlet?
Assuming there is power coming in to the unit; the symptom of "doing nothing" would indicate that the main contact is not completing a circuit; or BOTH the motor's start and run circuits are open.
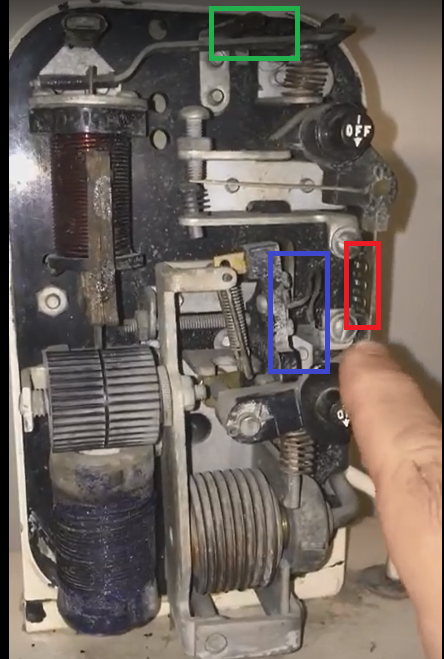
There are a few points which could be at the root of this, in the control. I have marked them on a screenshot from your video.
The green box shows the start contact. This will close, only when the motor is in the first few instants of operation, while it is picking up speed. This will not cause your problem.
The blue box shows the approximate location of the main contact. The main contact is obscured in your video because of the angle. It will open and close when the off and on levers are actuated.
Finally, the orange block shows the overload heater. This "S-curved" wire is a heating element which carries the motor's total current flow. It is positioned near a bimetallic strip, which will move when it gets hot. If there is a severe short circuit in the motor, it can melt or "blow off" part of the heater wire before the heat can trip the control.
If the overload heater wire is broken, or the main contact is not making contact, the result will be the symptom you have.
Take a look at the DR manual to get the right wires. Also look at your main contact. The control pictures in the manual will show those. I’m not aware of anyone out west that will work on these. These are pretty much DIY, especially in environmentally paranoid CA. I wish there were more of us.
This is a sad fact of life with these machines. Most of the people who would do odd jobs on things like this would find CA very unhospitable. This would be because of the excess rules and regulations placed upon them by the state; and the fear of getting caught and "made an example of."
As Travis said, I wish there were more of us who could help out fellow collectors and enthusiasts.
Sincerely,
David
|
|
|
|
Post by elec573 on Aug 23, 2018 1:58:28 GMT
Hello
Hate to say it been down this road before check the motor windings if good great we move on !
|
|
|
|
Post by danehenas on Aug 24, 2018 0:21:53 GMT
Tubokinetic, Thanks for the diagram... the main contact is opening and closing and overload heating wire seem to look O.K.
I took the back off and disconnected the Common, Starting and Running Winding wires coning up from the motor with a multi-meter and here's what I got:
Ground (screw holding down back of control box) to Starting winding wire is around 6-7 Ohms ( not kOhms). Ground to Running Winding wire doesn't read anything. Ground to Common wire is around 3.5 Ohms (not kOhms).
|
|
|
|
Post by turbokinetic on Aug 24, 2018 1:20:01 GMT
Tubokinetic, Thanks for the diagram... the main contact is opening and closing and overload heating wire seem to look O.K. I took the back off and disconnected the Common, Starting and Running Winding wires coning up from the motor with a multi-meter and here's what I got: Ground (screw holding down back of control box) to Starting winding wire is around 6-7 Ohms ( not kOhms). Ground to Running Winding wire doesn't read anything. Ground to Common wire is around 3.5 Ohms (not kOhms). Well, unfortunately, assuming these readings are accurate - your motor has suffered a winding failure. 
There should be continuity between the three winding wires, but not to ground. If there is ground continuity, it would be in the megohms range.
So it looks like the run winding is open circuit. This would cause it to do nothing at all, since the run winding is not actuating the start relay because it's not drawing current.
So, it looks like you'll be looking at a very involved repair, most likely a motor rewind.
Again, sorry to give sad news. Check for any and all wiring problems before making a decision, as there is a chance the wiring between the control and the motor is damaged. However, this has not been the case for the vast majority of people with these failure symptoms.
|
|
|
|
Post by coldspaces on Aug 24, 2018 1:59:30 GMT
Tubokinetic, Thanks for the diagram... the main contact is opening and closing and overload heating wire seem to look O.K. I took the back off and disconnected the Common, Starting and Running Winding wires coning up from the motor with a multi-meter and here's what I got: Ground (screw holding down back of control box) to Starting winding wire is around 6-7 Ohms ( not kOhms). Ground to Running Winding wire doesn't read anything. Ground to Common wire is around 3.5 Ohms (not kOhms). Well, unfortunately, assuming these readings are accurate - your motor has suffered a winding failure.
There should be continuity between the three winding wires, but not to ground. If there is ground continuity, it would be in the megohms range.
So it looks like the run winding is open circuit. This would cause it to do nothing at all, since the run winding is not actuating the start relay because it's not drawing current.
So, it looks like you'll be looking at a very involved repair, most likely a motor rewind.
Again, sorry to give sad news. Check for any and all wiring problems before making a decision, as there is a chance the wiring between the control and the motor is damaged. However, this has not been the case for the vast majority of people with these failure symptoms.
I concur that these readings would indicate a shorted motor. Sorry to hear this. |
|
|
|
Post by danehenas on Aug 24, 2018 2:05:18 GMT
|
|
|
|
Post by Travis on Aug 24, 2018 2:18:34 GMT
I’m sorry to hear your motor has grounded out. Please skim through a 47 page thread titled DR3 rebuild to get some information on the rebuilding process
|
|
|
|
Post by elec573 on Aug 24, 2018 3:55:43 GMT
I would suggest looking at the dra2 rebuild also that’s still going on . Just to see what you’re up against. Coldspaces has much more experience with rebuilding
these machines so I would look up some of his old posts as well .
|
|


